We are pleased to offer you 15 drills used by professional coaches and players in their training sessions — completely free.
Inside, you’ll find a mix of technical and tactical drills, as well as warm-ups and physical conditioning sessions.
Subscribe now to unlock the full site:
- 350+ padel drills and training sessions, all inspired by the pros, with new drills added every week.
- Create your own custom training sessions with the exercises of your choice.
- Mark drills as completed to track your progress over time.
- Save your favorite drills in the “My Favorites” section.
Pablo Crosetti: get Tapia’s lob with an intense lob-on-lob exercise
Taught by Pablo Crosetti (one of Tapia-Coello’s coaches), this 2-vs-2 physical drill brings high volume to the deep lob. A variation is then proposed to make the exercise more complex.
Description
2 pairs face each other on the court, both close to the net. The coach stands on one side of the court, close to the net.
The drill begins with the coach lobbing the ball to one of the teams at random.
The targeted team steps back to retrieve the ball and lob it back. Meanwhile, the opposing team moves forward to touch the net with the tip of their racket.
The opposing team then steps back to retrieve the opponent’s lob and return it also as a deep lob, while the other team moves quickly towards the net to touch it with the tip of their racket.
And so on, until the coach verbally authorizes one team to attack to start the free point.
Technical tips
Pablo Crosetti’s recommendations for playing good lobs, high and deep, and allowing you to recover the net, are as follows:
- Choosing the right ball for a lob:
- if the ball is poorly chosen, the lob won’t have enough quality, will be too short and/or too low, and will offer an easy attacking ball to the opponent.
- If the bounce on the back glass allows the ball to exit high enough, at least above knee level, then the ball offers the right conditions to play a lob. Generally speaking, it’s advisable to avoid hitting a lob on a ball coming out of the side glass, as the bounce will often be too low. Instead, it’s best to play these balls low, if possible before the bounce on the side glass.
- The descent on the legs and moving back up:
- the power to move the ball upwards comes from the legs. The player bends the knees and lowers the legs, to rise during the movement, and accompany the lob upwards.
- A good lob has little or no effect:
- a ball coming out of the racket with spin won’t generally rise as high as a lob hit flat. Yet height is an important quality of a good lob.
- The V-shaped ball curve:
- The good trajectory of a lob is V-shaped: it rises high in the air, slows down and then falls back down steeply, almost parallel to the back glass.
- If, on the other hand, the ball has a U-shaped trajectory (a parabola), it will not rise high enough and will come out of the back glass with a lot of forward bounce, making it easy for the opponent to return.
- With a V-shaped trajectory, the bounce on the back glass remains very close to the glass, making it difficult for the opponent to attack.
Variation
Improving lob depth
The coach places a line of markers at the back of each court, which defines whether the lobs are deep enough or not.
If one of the 2 pairs manages to place 2 lobs deeper than this marker, then that pair has the right to attack the point with a bandeja or vibora.
Working on the depth of your volleys to maintain superiority at the net: the perfect pre-season exercise
A deep volley ensures that your opponent is put under pressure and that you retain superiority at the net. This drill is perfect for pre-season, allowing you to work on the depth of your volleys and control of the ball on the volley.
Two pairs position themselves on the court in their usual roles. The coach stands behind one of the pairs to observe the drill and provide feedback and corrections.
The players play a set to four games, with the following rule in place:
- The serving pair (the attacking team at the start of the point) must aim to have all their volleys bounce beyond the service line.
- The defending pair must play low defensive shots and is not allowed to lob as long as the attacking volleys continue to bounce deep, beyond the service line.
As long as the attackers’ volleys are deep enough (bounce past the service line), the defenders are therefore forbidden from playing lobs.
Conversely, if a volley bounces inside the service boxes, the defenders are then allowed to play a lob in order to regain the net.
Once the defenders have played their first lob, the rally becomes completely open.
Aside from this specific rule, the point is played freely. On deep balls, defenders who are not allowed to lob may use any other shot available to try to regain the net or win the point directly.
The objective of this drill is to encourage players to naturally lengthen their volleys so that they bounce at least beyond the service box line. A short volley will be used by your opponents to hit an effective lob and take back the net. If your volleys are deep enough, the defenders will be forced to play them off the back glass, and if you apply good slice, the ball will drop after hitting the glass, making it very difficult for your opponents to hit a lob.
Here’s a video demonstration of the exercise:
Video credits: Rodri Ovide – TE CUESTA VOLEAR PROFUNDO 🧐??? EJERCICIO DE PRETEMPORADA #PADEL – YouTube
Martin Di Nenno and Paquito Navarro: an exercise to work on finishing under pressure
Worked on in training by Martin Di Nenno and Paquito Navarro, this 4-player drill aims to improve the player’s finishing, without making a mistake because of the pressure.
Two pairs position themselves on the court in their usual roles.
The coach stands behind one of the pairs at the back of the court, or near the court entrance.
One or more tie-breaks to 11 points are then played in open play, under the following rules:
- Each player has only one serve (no second serve).
- The receiving team must play a lob on the return of serve.
- The serving team must then play an aggressive víbora (or a powerful smash) and, if the ball allows it, try to finish the point.
If this first attacking shot successfully finishes the point, the attacking team scores two points immediately.
If, however, this first attack results in an error, the opposing team scores two points immediately.
If the first attack does not finish the point, the rally then continues freely.
If the serve is missed, the opposing team is awarded three points. This rule discourages overly aggressive serves and ensures a playable return, allowing the receiver to lob.
An error on the first overhead shot is therefore heavily penalized for the attacking team (two points awarded directly to the opponents), in order to discourage unforced errors in this offensive situation. Servers must attack aggressively, but above all with controlled risk management.
The objective of this drill is to work on an aggressive víbora to put pressure on the opposing pair, aiming for a double wall with pace and depth. However, it also encourages players to manage their risk-taking thanks to a punitive scoring system (the opponents earn 2 points if I miss my first víbora).
Here’s a video demonstration of the exercise:
Video credits: Rodri Ovide – EJERCICIO PADEL: SIENTES PRESIÓN AL DEFINIR CON TU VÍBORA? #PAQUITONAVARRO #MARTINDINENNO – YouTube
Learning the gancho: 3 progressive drills for right-side players
The gancho is a very specific and often underestimated shot, yet it can be extremely effective when executed well.
Popularized by Fernando Belasteguín, it is played from the right side of the court when the player is late on a lob. These three progressive drills focus on building the foundations of the gancho so you can add it to your technical arsenal and use it at the right moment.
Drill 1
Gancho technique with hand-fed balls
In this basic drill, each player holds two balls and uses them to practice the motion, tossing them one by one to simulate a high lob.
From the right side of the court, the player positions with the left shoulder facing the diagonal fence and prepares the racket high behind the head, aligned with the stroke.
The contact point should be directly above the head with the arm almost fully extended, not beside the body.
The gancho is usually hit flat; there’s no need to try to add spin. The quality of a good gancho comes from its placement toward the fence.
The shoulders rotate with the motion, and the stroke is fast and vertical, finishing with a relaxed wrist to guide the ball toward the opposite fence.
Here is the video demonstration of the exercise:
Video credits: 👉 CLASES DE PADEL · Ejercicios de RULO🎾 | Padelarte.com – YouTube
Drill 2
Gancho on high feeds from the coach
The coach sets a cone near the net to mark the attacking position. Players will start from this cone, and the coach positions on the opposite side to feed high balls.
The player starts at the cone, then backpedals to get under the ball, adjusts the preparation, and hits a cross-court gancho toward the side fence.
After the shot, the player quickly returns to the cone to simulate an aggressive repositioning, then gives way to the next partner.
This drill works both footwork and recovery timing, which are often neglected after playing a gancho.
Drill 3
Gancho followed by a backhand volley
In this drill, the coach feeds an alternating sequence to each player: first, a high ball to hit a cross-court gancho, followed by a lower ball aimed at the backhand volley.
After the gancho, the player must recover quickly, make a small split step to stabilize, and then move forward to play the backhand volley aimed at the center of the court.
The goal is to recreate a realistic match sequence: being late on a lob, regaining the initiative with a gancho, and continuing the pressure with a well-placed volley. The drill is repeated about ten times to build strong automatisms.
Drill 4
Gancho followed by a forehand volley
This final drill is similar to the previous one, except players now follow up their gancho with a forehand volley.
This variation reinforces adaptability and helps players stay offensive after using the gancho, regardless of which volley they need to play next.
Workshop on the finishing volley: a super offensive gesture for finishing the point directly, but to be used with great care (with Franco Stupaczuk)
Practiced by Stupa in training, this classic format of alternating two movements enables you to put a lot of volume on the vibora, and above all to work on your finishing volley, a super-aggressive, difficult and risky gesture, to be used with caution.
Recommended for experienced players only, this well-mastered gesture can be a real asset to your technical palette.
Drill execution
The player positions himself on his usual side of the court, starting in a volley position.
The coach stands on the opposite diagonal at the back of the court with a basket of balls.
The coach alternates between:
- A high lob, with a depth around the service-line area, on which the player moves back and plays a powerful diagonal víbora; then
- A soft volley feed, around shoulder height (or slightly above), which the player steps forward to attack with a flat, down-the-line finishing volley, aiming to end the point immediately.
This sequence is repeated three to four times, depending on the player’s level and cardiovascular capacity.
Coaching tips
The finishing volley is a high-risk and difficult shot to master. Because of the power involved, it is easy to commit a length error if the ball is not at the right height or if the player does not fully control the technique.
For this reason, the drill is best suited to advanced players.
On this shot, the player should strike the ball flat to generate maximum power and a straight trajectory. The player commits forward into the ball and should aim toward the service line, not all the way to the back of the court, in order to keep a margin for depth and avoid unforced errors.
Variation: decision-making under uncertainty
The variation consists of performing the same drill while adding an element of unpredictability on the second ball.
The coach always feeds a first lob, which the player returns with a diagonal víbora.
However, on the second ball, the coach now feeds randomly:
- A soft, easy ball at shoulder height, on which the player can hit a powerful finishing volley, looking to end the point; or
- A lower, more driven ball, on which a finishing volley is not a good option. In this case, the player must play a controlled volley, either cross-court or down the line, aiming for the glass angles or the middle of the back glass with limited rebound.
The player must therefore decide when it is appropriate to attempt a finishing volley and when it is not, developing decision-making skills and the ability to use this shot intelligently in training situations and matches.
Technical work and practice of the rulo, a slow overhead shot that crosses over towards the fence
When your opponent’s lob doesn’t allow you to play a vibora, it’s preferable to play an overhead shot in control, to keep your position at the net without taking excessive risks. A rulo, a slow overhead shot that crosses over towards the diagonal fence, can be useful in this type of situation.
This drill, taught at the Gustavo Pratto Academy, enables you to work on this gesture, and put it into practice in a real game situation.
Setup
This drill can easily be adapted depending on the number of players involved.
The players position themselves on one side of the court, each in a volley position on their usual side. One player starts as the active hitter, while the others line up behind in a waiting position.
The coach stands on the opposite side of the court, on the T, with a basket of balls.
Drill execution
The coach feeds not-too-deep lobs, alternating one to the left and one to the right.
Players take turns hitting a rulo, aiming toward the diagonal fence. This is a slow overhead shot — players do not need to hit hard — with precision as its main quality.
Because the rebound off the fence is often unpredictable, this shot helps place the player in a strong offensive situation.
After hitting their shot, players rotate out and allow the next waiting player to step in and play their turn.
The coach can place markers on the court to clearly define the target zones.
Technical tips
The player should not try to add power to the rulo, as doing so significantly increases the risk of a direct error. Accuracy and topspin are the key elements of a successful rulo.
This is not a finishing smash, but a slow overhead shot designed to maintain net position. Playing a rulo when a víbora or aggressive smash is not possible — because the player is slightly late on the ball — helps avoid letting the ball pass and ending up in a defensive position.
This shot can indeed be risky, as depending on the incoming lob, the angle toward the diagonal fence can quickly become very tight. The player must therefore learn to judge when the shot is playable and when it is too risky.
In general, the more the opponent’s lob is angled toward the side glass, the easier it is to find the diagonal fence. Conversely, the more central the lob, the harder it becomes to target the diagonal fence — especially for a left-side player.
Here’s a video demonstration of the exercise:
Video credits: VIDEOANÁLISIS DE PRATTO A MI PARTIDO (MASTERCLASS) – Wings to Pro – el4Set – YouTube
Variation
Match-play application
Four players take their positions on the court: one pair at the net and one pair defending at the back of the court.
The coach stands in the center of the court, behind the defending pair.
The coach starts the point by feeding a lob to one of the attacking players.
That player returns the ball with an overhead shot toward the side fence, applying the concepts worked on in the drill.
The point then continues in open play.
Here’s a video demonstration of the variation:
Learning to play backhand transition volleys to manage your approach to the net in two steps
When transitioning from defense to attack, players sometimes need to hit a volley while moving forward, before they are ideally positioned at the net — this is known as a transition volley.
These two exercises focus on performing this shot with proper technique, maintaining margin for error, and setting up the best possible position to finish the approach and attack at the net.
Although this series emphasizes the backhand volley, it can also be practiced on the forehand side.
Drill 1
Setup:
The coach places a cone at the back of the court on the left side, in the defensive position, and a line of cones at the net on the same side.
Players line up behind the cone in the backcourt to take turns.
On the opposite side, the coach places two cones in the middle of the back of the court to mark the target area for the players’ volleys.
The coach stands parallel to the players, with his basket of balls.
Sequence:
The coach feeds two balls in a row to each player:
- The first ball is a defensive one to be played before the back glass, which the player returns with a parallel backhand from the back of the court. The player then moves quickly forward to close down the space. Since the backhand was hit parallel, they close the space along the side glass.
- Then, the coach feeds a second ball into the player’s run as the player is finishing his approach to the net. The player adjusts and hits a safe backhand volley toward the center of the court, between the two cones set up by the coach.
Technical focus:
The backhand volley remains a safety volley played through the middle, on which the player should not take excessive risks. The player is still finishing his approach to the net and is not in an ideal position to try to attack this volley.
The purpose of the cone line at the net is to make players transfer their body weight forward on the backhand volley, ensuring the volley is struck with depth to make the transition more effective.
The player must step their right foot past the cone line when volleying. If they instead take a lateral step, the volley will lose depth and the net approach will be less effective.
Before contact, the player pauses with a small adjustment hop, pivots, and transfers their body weight forward through the shot.
The power comes from the whole body, not from swinging the arm back. Players keep a short preparation at shoulder height to maintain control.
Here is the video demonstration of the first drill:
Video credits: 👉 CLASES DE PÁDEL · VOLEA en 🎾 TRANSICIÓN ⭐⭐⭐⭐⭐ | Padelarte.com – YouTube
Drill 2
This drill simulates a realistic match scenario where a player must volley while positioned slightly behind the ideal net position — for example, during a transition from defense to attack when they haven’t had time to get fully to the net.
These slightly deeper volleys are called transition volleys and are essential for securing the net.
Setup:
The coach keeps the cone at the back of the court and places one cone at the net in the normal volley position, plus another cone roughly 2 meters behind it — the spot for hitting the transition volley.
Players line up as in Drill 1, starting behind the backcourt cone.
Sequence:
The coach feeds the following 3-ball sequence to each player:
- A first ball to be played with a parallel backhand from the backcourt before the back glass (same as in Drill 1).
- The player moves forward, and the coach feeds a second ball mid-approach (around the middle of the court) to the backhand volley.
The player pauses, makes an adjustment hop, and plays a parallel transition volley deep to the back of the court. This shot must be deep to prevent the opponent from attacking down low and allowing the player to finish moving to the net. It doesn’t have to be fast, as the player won’t have time for a full setup, but it must be deep with a full volley follow-through (unlike a block volley).
- The player finishes their movement to the net and is now in position to hit an attacking diagonal volley on the third ball from the coach. Once well positioned, he will then be able to put pressure on his opponent with a solid volley.
👉 Explore all our technical drills: Technical drills
➡️ Discover all our fundamentals session here: All fundamentals sessions with progressive drills
Paquito Navarro: a simple tactic to take the initiative from the serve – a serve on the T and an aggressive volley in the open space
This drill demonstrates a simple tactic used by many players on the pro circuit, including Paquito Navarro, to gain the advantage in the exchange from the very start of the point. It consists of training the following strategy right from the serve: a serve on the T, followed by an aggressive volley into the space freed up by the receiver’s movement.
Description:
Two pairs position themselves in their usual roles.
The players play one or several tie-breaks while trying to apply the following strategy:
The server hits their first serve straight down the T, with depth.
They then move forward to the net, and the attackers play an aggressive volley into the space opened by the receiver’s movement toward the T. The first volley will therefore be played into the receiver’s glass corner.
The servers use this strategy only on the first serve, because it needs to be firm and aggressive for the tactic to work properly. The defender will then have very little time to recover their corner after the return.
Try to apply a good slice effect on the serve so the ball digs into the ground right after bouncing off the back glass. It will then be very difficult to return if the defender plays it after the glass rebound.
From time to time during the tie-break, the servers vary their serves, aiming at the side glass for example, to surprise the opponents and avoid being too predictable.
The receivers must try to counter this strategy however they can, with an immediate lob, a chiquita return, or a shot toward the opponents’ weak spot.
The points then continue as free play.
Technical–tactical advice:
It is essential that this first attacking volley bounces on the back glass (glass 3) and then on the side glass (glass 2), in that order and not the opposite, to send the ball away from the defender’s recovery path.
If you aim for the side glass first and it then rebounds onto the back glass, it will actually be counterproductive because the ball will come back toward the defender’s movement.
So attack directly toward glass 3, the back glass near the corner.
Lob Tactics: hit a good diagonal lob and follow it with a cross-court shot toward the diagonal fence
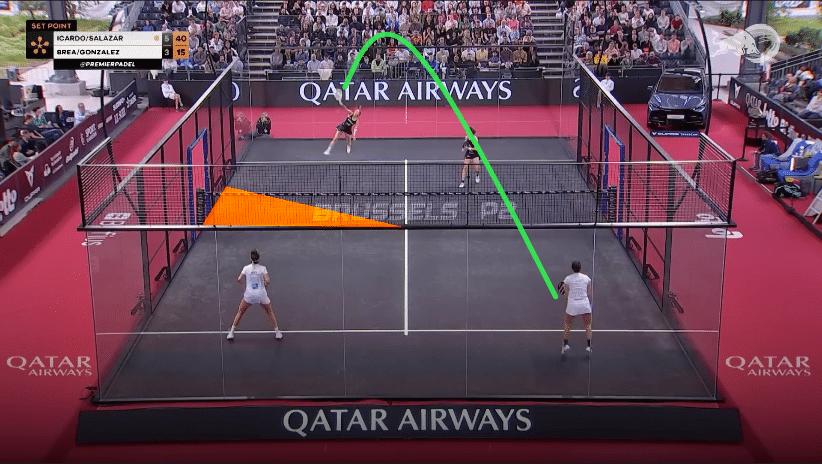
This tactic, highly effective at both beginner and advanced levels, consists of taking advantage of the space created by a high diagonal lob by playing your next shot into the open area along the diagonal fence.
Knowing this combination also helps you anticipate and plan your next shot after your diagonal lob, allowing you to play more intelligently with a clear game plan.
Video credits: USE These THREE LOB COMBINATIONS to Take the Net! | ThePadelSchool.com – YouTube
The tactic
The tactic consists of hitting a good high diagonal lob and then following it with a low cross-court shot aimed toward the diagonal mesh.
Your first diagonal lob will automatically create a triangular open space that you can target with your next shot—either with a ball that rebounds off the diagonal mesh, or with a chiquita that drops at your opponent’s feet.
In both cases, your opponent will be in trouble and out of position.
Theoretical explanations
Beginner level:
At beginner level, this tactic is useful because it makes you think about your next shot after the lob.
After returning your lob, your opponent often won’t move back up to the net quickly, leaving a large open area—a wide triangular space—into which you can play your follow-up shot.
You don’t need a spectacular shot: no extreme spin, perfect angle, high power, or a perfectly precise chiquita that dies just before the mesh. Simply play calmly into the open space.
The more your opponent returns your lob with a cross-court angle, the easier it will be for you to target the diagonal mesh with your next ball.
The lob must be diagonal for this tactic to work and for this space to open. It does not work with a parallel lob.
Advanced level:
At a higher level, you can refine your low shot—either with a well-placed, slower chiquita that drops at your opponent’s feet, or with a strong ball that rebounds off the fence.
In both cases, it will be a difficult ball for your opponent to return, and they will inevitably end up out of position afterward.
The smash feint to surprise opponents expecting a powerful overhead — tips and drills from Paquito Navarro
On a high ball, when the opposing pair is anticipating a powerful smash, a well-executed smash feint can catch them off guard and become a decisive weapon.
This drill breaks down the theory behind the smash feint, followed by two practical exercises recommended by Paquito Navarro.
The technique (theory)
The purpose of this shot is to make the opponents believe you’re going to hit a powerful smash — either a flat winner through the middle or a “par 3” (out of court) smash — but at the very last moment, play a soft shot down the middle of the court.
There are two key aspects to executing this move successfully:
- Make the exact same preparation and swing as a powerful smash, but slow down the arm at the last second to surprise the opponents.
- Play a soft ball with the aim of it bouncing twice before reaching the back glass.
When receiving a lob, the player prepares as if for a powerful overhead.
If he notices that the opposing pair is expecting a hard smash — by moving toward the net or preparing to exit the court for a par 3 — or their partner calls it out, he slows down his arm and plays a soft shot toward the center of the court to catch the opponents off balance.
The swing should start exactly like a full-power smash, but the final execution changes based on the opponents’ position.
Note: This feint only works effectively if the player has already mastered the technique of a powerful overhead. Without that threat, the opponents won’t be fooled by the softer option.
Technical demonstration by Paquito Navarro:
Video credits: Aprende con Paquito Navarro 3×05 – El Amague – DaleCandela TV – YouTube
Practical application
Drill 1
The player stands at the net, roughly in the middle of the court.
The coach positions himself at the back of the court with a basket of balls.
The coach feeds high lobs (not too deep), allowing the player to alternate between:
- A powerful flat or topspin smash (aimed to return to their side or exit the court via the side glass — “par 3”).
- A soft smash feint, aimed down the center of the court, with the goal of the ball bouncing twice before hitting the back glass.
The player must make the exact same preparation for both shots to visually sell the powerful smash and deceive the opponent.
The coach provides feedback on posture, timing, and the quality of the feint.
Drill demonstration by Paquito Navarro:
Drill 2 + Advanced tactic
In match situations, once the opposing pair realizes that the player is capable of feinting the smash, they may adapt with the following strategy: one player exits the court or steps forward to defend against a powerful smash, while the other stays in a central position to cover the soft feint.
In this scenario, a good variation is to aim the feint toward the side fence, catching off guard the player who is positioned in the center of the court.
In this second drill:
- The coach continues to feed high lobs as before.
- The player now targets the side fences instead of the center, alternating between the left and right fence to vary shot placement and train for different match situations.
To aim at the diagonal fence, the player can use a slight kick, similar to a rulo.
To target the parallel fence, they should use shoulder rotation and controlled follow-through.
Second drill demonstration:
👉 Explore all our tactical drills: Tactical drills
Take your coaching to the next level with the premium membership.
- 350+ padel drills and sessions inspired by the pros. New exercises every week.
- Create your own personalized training sessions with the exercises of your choice
- Add your favorite drills to your Favorites section + Progress tracking
🛡️ Satisfaction guaranteed or your money back within 30 days. – ⭐ Already trusted by 670+ coaches and players
Exchanges with 2 balls at the same time to stimulate reflexes and peripheral vision
Federico Chingotto uses this simple game to warm up while working on reflexes, global and peripheral vision and anticipation.
Description
Four players take their usual positions on the court.
Two players — one from each pair, positioned parallel to each other — serve at the same time, putting two balls into play simultaneously.
The rallies are then played out freely, with both balls kept in play for as long as possible.
Points are counted ball by ball:
- If a pair wins one ball and loses the other, the score is 1–1.
- If a pair wins both balls in play, the score is 2–0.
The key to winning this game is to quickly play multiple balls toward the same opponent, who will not have enough time to adjust and handle two balls arriving almost simultaneously.
This fun warm-up develops reflexes, game awareness, and the ability to make quick decisions during rallies.
Here’s a video demonstration of the exercise:
Video credits: Rodri Ovide – EJERCICIO PÁDEL: ENTRADA EN CALOR #FEDECHINGOTTO #RAMIMOYANO #PINCHOFERNANDEZ #PABLODIAZ – YouTube
Miguel Lamperti and Maxi Grabiel warm up in the tiny game
Used as a game by Miguel Lamperti and Maxi Grabiel, this drill is perfect for ball control in small spaces.
Description
Setup:
The coach places markers (for example, orange ones) in a square shape, about 1.5 to 2 meters apart, to define a small playing area.
He then places cones of another color (for example, yellow) behind the players and to the side.
The two players position themselves facing each other at the opposite ends of the orange square.
Drill progression:
The objective of the drill is to return the ball to the opponent by making it bounce once—and only once—inside the orange square.
The second bounce of the ball must land in the yellow zone, preventing players from hitting too hard.
This warm-up is a fun little game that allows players to work on their footwork while improving ball control in tight spaces.
Here’s a video demonstration of the exercise:
Video credits: Padel Play Sports – Calentamiento de un jugador profesional de PADEL – YouTube
👉 Discover all our ready-to-use sessions: Session templates
Di Nenno’s pre-season physical training to strengthen the upper body
Used by Martín Di Nenno during his pre-season preparation, this upper-body strength circuit is quite complete for padel players.
It is demanding because it combines several multi-joint movements that require good physical condition and explosiveness: medicine ball slams, barbell cleans, push-ups, pull-ups.
Required equipment: light medicine ball (around 3 kg), barbell with light plates (2 or 5 kg), pull-up bar
Exercise 1
Upper body strength and explosiveness
Equipment: 3 kg medicine ball
Players stand with the medicine ball in their hands.
With a torso rotation and feet firmly planted on the ground, they pass the ball overhead and throw it powerfully down to the floor on either the left or right side of the body.
They catch the ball immediately after the bounce and use that energy to throw it to the other side.
Repeat for 10 reps on each side.
Throughout the exercise, players must keep their core tight. Warm up the shoulders beforehand, as they will be heavily engaged.
Take a 1 minute 30 second rest before moving to the next exercise.
Video credits: MARTIN DINENNO: ¿CÓMO SE ENTRENA LA PARTE FÍSICA EN EL PADEL? – TeenPadel – YouTube
Exercise 2
Light barbell clean
Equipment: barbell and plates (2–5 kg depending on level)
Players place the barbell on the ground, starting with no added weight to avoid injury.
They perform a set of 7 cleans.
After a few repetitions, if the weight feels too light, they can add 5 kg plates to the bar.
If you’ve never performed this movement, it is recommended to do it under the supervision of a fitness coach to prevent injury.
Proper technique for the barbell clean:
- Feet shoulder-width apart, bar close to the shins.
- Firm pronated grip, back straight, eyes forward.
- Explosive extension of hips and legs, then high pull.
- Quickly drop under the bar and catch it on the shoulders, elbows high.
- Stand up straight to finish.
- For the next rep, you don’t need to reset the bar to the ground; you can simply lower it with arms extended.
Tips: Keep a neutral spine throughout, avoid rounding the back, and keep heels grounded at all times.
Take a 1 minute 30 second rest before the next exercise.
Exercise 3
Push-Ups
The player then performs a set of 7 push-ups, with full range of motion (chest close to the ground).
Proper technique for push-ups:
- Hands under shoulders, body aligned.
- Control the descent, elbows at about 45° from the torso.
- Push up explosively, without arching the lower back.
Tips:
- Keep the core engaged throughout.
- Avoid flaring the elbows too much, as this puts extra stress on the shoulders.
- If 7 push-ups are too difficult, do them on the knees or with hands elevated.
Take a 1 minute 30 second rest before the next exercise.
Exercise 4
Pull-Ups
Probably the most demanding movement of the session: pull-ups.
To make it easier, you can use a resistance band attached to the bar to support part of your weight.
The player performs 7 pull-ups in pronation.
Proper technique for pronated pull-ups:
- Hang fully from the bar with an overhand grip (palms facing away).
- Pull vertically, engaging the back, until the chin is above the bar.
- Control the descent back to the starting position.
Tips:
- Avoid swinging or using momentum.
- If too difficult, perform Australian pull-ups (with a low bar, feet on the ground, body inclined).
- Don’t pull only with the arms—activate the scapulae first.
- Never push to complete failure if technique breaks down.
Once the 4-exercise circuit is complete, take 3–5 minutes of rest and repeat it a second or even third time, depending on your fitness level and available time.
Neural activation drill to improve reflexes and coordination with Ariel Saravia
This fun neural activation drill helps the player sharpen their reflexes on court while also working on agility.
The player must stay fully alert throughout the exercise, catching balls thrown by the coach and immediately returning them, with several variations to increase difficulty.
Equipment needed: 2 balls (tennis, padel, or similar)
The coach stands in front of the player, about one meter away, holding two balls.
The player’s goal is to catch the balls thrown by the coach and return them right away, without letting them fall or bounce.
The coach starts by throwing one ball to each side of the player at medium intensity, which can be increased progressively. The player catches the balls and quickly returns them to the coach.
The coach spaces the throws so that the player has to use lateral footwork to reach them.
Video credits : ENTRENANDO 5 DÍAS COMO AGUSTIN TAPIA (DÍA 4) – el4Set.mp4 – YouTube
Variation 1 :
At this stage, the coach no longer alternates left and right consistently. He may throw multiple balls in a row to the same side.
This makes the sequence less predictable and forces the player to adapt quickly.
Variation 2 :
In this final variation, the coach can now use fakes to trick the player.
To further increase the challenge, he can also add rolling balls on the ground, forcing the player to change levels to retrieve them. This adds an extra dimension to the drill, as the player must stay attentive both to high and low balls.
Alejandro Galán’s physical training with David Antona
This moderate-intensity session, designed and practiced by Ale Galán with his physical trainer David Antona, focuses on injury prevention and overall strengthening.
The three main exercises target core stability and mobility, leg and back strength, and interval-based cardio. The session concludes with stretching.
Equipment needed: medicine ball, TRX or fixed bar (middle height), treadmill (optional)
Exercise 1
Core and mobility drills on the floor
Equipment: Medicine ball, exercise mat
Drill 1
The athlete lies on his back on a mat. He performs a hip flexion (legs up at 90°) with knees bent at 90°.
Arms are extended straight toward the ceiling, with shoulders and scapula slightly lifted off the floor.
The movement consists of lowering both arms completely backward until maximum range, then returning them upward, keeping arms straight and the abs fully engaged.
He performs 10 slow, controlled repetitions.
The athlete then rests for one minute.
Drill 2
Back in the same position, the athlete repeats the movement, but this time, whenever the arms move backward, one leg extends and returns without touching the ground. He alternates legs, completing 20 repetitions in total.
One minute rest.
Drill 3
Still in the same position, the athlete now holds a 2–3kg medicine ball. He repeats the first movement (arms overhead and back to vertical), keeping the arms straight, shoulders and scapula off the ground.
The exercise remains slow and controlled for 10 reps.
One minute rest.
Drill 4
With the medicine ball still in his hands, the athlete repeats the same movement but extends and bends only one leg at a time. He performs 10 reps with the same leg, rests one minute, and then repeats with the opposite leg.
Video credits: ALE GALÁN ENSEÑA SU SECRETO PARA ESTAR EN FORMA – Entrenamiento Físico para Pádel – PadelForAll – YouTube
Exercise 2
Balance and strength circuit
Equipment: TRX or a fixed bar at hip height
This second part consists of a 2-drill circuit. The goal is not speed, but proper form and control.
Drill 1: Single-leg squats with TRX support
Using TRX straps for support, the athlete lifts one leg backward and slowly performs a single-leg squat with the other.
He holds the bottom position isometrically for 3–4 seconds, then returns to standing.
The back leg does not touch the ground at any point.
He completes 6 reps per leg, with rest in between if needed.
This drill strengthens the quadriceps to support the knee joint and prevent injury.
Drill 2: Australian pull-ups (inverted rows)
The athlete positions himself under the TRX, holding the straps firmly, body inclined, arms straight. He pulls his chest toward the handles by bending his elbows, then lowers himself back down in control.
This exercise mainly works the back, biceps, and core.
The steeper the angle (closer to horizontal), the more challenging it becomes.
He performs 10 repetitions.
The athlete then repeats the full circuit:
- 6 single-leg squats (right leg)
- 6 single-leg squats (left leg)
- 10 Australian pull-ups
Exercise 3
Interval cardio on treadmill or outdoors
The athlete uses a treadmill (or outdoor space if unavailable).
The goal is to repeat the following sequence 3 times:
- 2 minutes of high-intensity effort (about 8/10 on perceived exertion)
- 1 minute of recovery (either light jogging at about 3/10 effort, or complete rest off the treadmill).
This develops aerobic capacity, cardio endurance, and VO2max.
Exercise 4
Leg stretching
To close the session, the athlete performs two key stretches.
Hamstring stretch (one leg at a time):
Sitting on the floor, one leg extended, the other bent with the foot against the inner thigh.
Keeping the back straight, the athlete leans forward toward the extended leg, aiming to touch the toes. The stretch should be felt in the hamstrings and sometimes in the lower back.
Hold for 30 seconds per side.
Butterfly stretch:
Sitting upright, the athlete brings the soles of the feet together, with knees bent outward. With a straight back, he gently presses the knees toward the ground using the elbows to deepen the stretch.
Hold for 45 seconds to 1 minute.
Explore all the 300+ exercices and training sessions available on TrainingPadel.com here :