4 drills to work on finding space in defense (right-side player version)
This session is designed to address a common issue seen in many players during defensive play: hitting balls directly to the opponent, making their life easier rather than putting them under pressure.
By focusing on empty spaces—gaps not covered by the opposing pair—these 4 drills (with variations) will teach players how to aim for the right zones with the appropriate pace, forcing their opponents to move and creating more challenging situations for them.
Introduction
Beginner and intermediate players in defense often tend to play the ball directly into their opponent’s zone. The root of this issue is that players focus too much on the opponent instead of visualizing the open spaces on the court.
The key is to mentally identify and visualize the gaps—the areas not covered by the opponents.
The goal of these drills is twofold:
- Learn to recognize these open zones.
- Practice placing the ball into those zones with purpose.
The aim is to focus on the free space on the court in order to make opponents run, and avoid giving them balls they can play easily in their comfort zone.
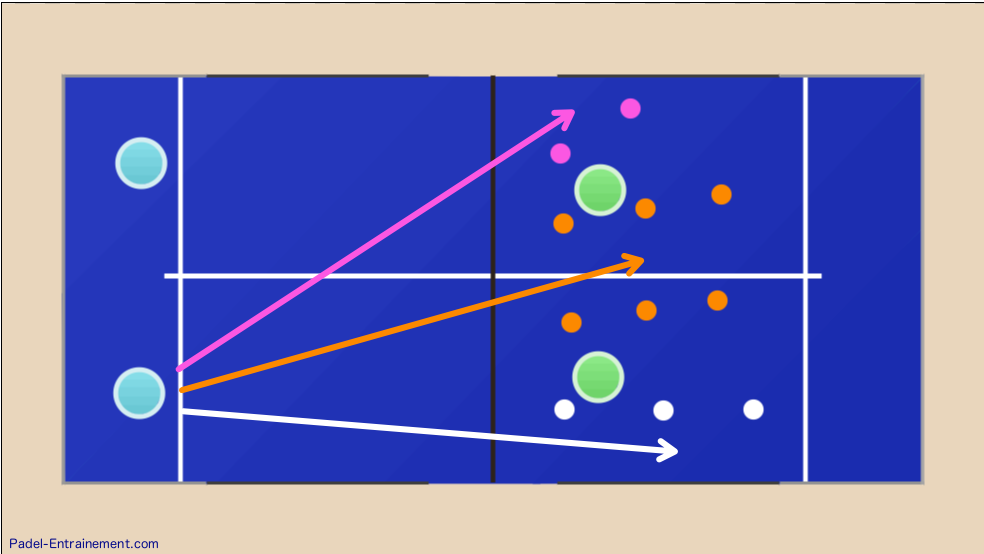
The coach will mark out three target zones using cones:
- The parallel line along the side glass
- The middle of the court
- The sharply cross-court angle toward the side fence
These are areas that put the net players under real pressure.
In defense, a fourth possible option is the lob toward the back of the court—but this will not be covered in today’s session.
Although the drills are designed for right-side players, they can easily be adapted for left-side players.
Drill 1
Defensive shot down the line along the side glass
Setup:
Players position themselves at the back of the court, right-hand side.
The coach stands on the opposite side with his basket of balls, feeding forehand balls that are not too aggressive—allowing players enough time to adjust and target properly.
Execution:
Each player hits a defensive shot down the line along the side glass, then quickly transitions forward and re-joins the line.
This way, players are starting to work on transitioning toward the net in anticipation.
Objective:
The goal is for the ball to bounce twice on the court before reaching the back glass.
Why? Because if the shot is too hard and deep, it may rebound off the back glass and allow the opponent to play it comfortably. A double bounce prevents that and forces errors.
Shots should be hit flat or with topspin, but not sliced.
Here is the video demonstration of the first exercise:
Video credits: 👉 CLASES DE PADEL · Búsqueda de Espacios 🎾 | Padelarte.com – YouTube
Drill 1-bis
Down-the-line defense followed by an aggressive forehand volley
Execution:
Same initial setup, but after the defensive shot down the line, players immediately transition to the net, and finish the point with an aggressive forehand volley to the center.
Just before the volley, players should pause and perform a split step, avoiding hitting the volley on the run and ensuring stable footwork for the attack.
Tactical focus:
This variation teaches players to close the angles after playing down the line—specifically, to cover the same parallel zone they just targeted, preventing counterattacks along that line.
Drill 2
Defensive shot to the center between opponents
Setup & Execution:
Players again start from the back right-hand corner.
The defensive shot this time is aimed at the center of the court, between the two opponents.
Why the center?
- The net is slightly lower in the middle—reducing error risk
- A well-placed ball in the middle can create confusion about who should take it
As with the first drill, the goal is to make the ball bounce twice before hitting the back glass.
Drill 2-bis
Center defense followed by an aggressive volley
After playing a defensive shot to the center, the player moves up to the net and finishes with a deep, aggressive forehand volley to the center.
Players should use a short backswing before the volley to maintain control.
Drill 3
Defensive shot cross-court toward the side fence
Setup & Execution:
Players stay in a defensive position and take turns hitting the ball to the sharply angled cross-court zone, toward the fence.
Tactical notes:
This target is riskier and requires more precision.
Only attempt it:
- On easier balls where the player can fully adjust
- In comfortable match situations (e.g., when leading), not on crucial points
After hitting the shot, players return to the line.
Drill 3-bis
Cross-court defense followed by a backhand volley
After playing a sharply cross-court shot, players move up to the net and finish the sequence with an aggressive backhand volley to the center.
Why backhand? Because after a sharply cross-court shot, it’s more likely the ball will come back to the backhand volley zone than the forehand.
Drill 4
Pair coordination when transitioning to the net
Setup & Execution
Two players start at the back—one on the left, one on the right.
The coach feeds a deep ball to the middle, rebounding off the back glass. The left-side player hits a sharply cross-court defense.
Then, both players move up to the net in sync, covering angles and closing space.
The coach sends a follow-up ball to the right-side player’s forehand volley, who finishes with a deep, aggressive volley to the center.
Players recover to the back of the court and repeat the pattern.
Rotate players after several repetitions (if there are more than 2 players).
Unlock your full potential now with 300+ exclusive drills.
Only $11/month, no commitment.